

In the world of photography, achieving precise focus is a requirement when capturing great images. Whether you’re shooting a landscape, a candid portrait, or a blink-and-you’ll-miss-it moment in a fast-paced event, sharp focus can make or break your image.
By default, most cameras incorporate the focusing function within the shutter button. Usually, this means that the photographer must half-press the button to bring the subject in focus, before fully depressing the button to capture the image. The focusing function is essentially locked into the action of activating the shutter and taking the photo.
A technique that has revolutionized the way photographers approach focus is back-button focusing. In this comprehensive guide, we’ll delve deep into the intricacies of back-button focusing, exploring its origins, advantages, implementation, advanced techniques, and practical tips to help you master this powerful tool.
Table of Contents
A Little Primer on the Camera’s Autofocus System
To achieve the sharp focus we’re looking for, we usually choose to use our camera’s autofocus function, which is a sophisticated system designed to automatically adjust the focus of the lens to ensure that the subject in the frame appears sharp and clear.
There are several methods cameras use to achieve autofocus, with the most common being phase detection autofocus (PDAF).

Without getting too sidelined on focusing specifics, phase detection autofocus is the primary method used in DSLR cameras for achieving fast and accurate autofocus. Here are the basics of how it works.
- Autofocus Sensor. Inside the DSLR camera, there is a dedicated autofocus sensor located at the bottom of the camera body, separate from the image sensor. This sensor receives a portion of the light passing through the lens.
- Splitting Light. The incoming light is split into pairs of images by a semi-transparent mirror in front of the camera’s image sensor. These pairs of images are slightly offset from each other.
- Phase Comparison. Each pair of images is analyzed by the autofocus sensor to determine the phase difference between them. If the subject is out of focus, the phase difference will be detected.
- Calculating Focus Adjustment. Based on the detected phase difference, the camera calculates the amount and direction of focus adjustment required to bring the subject into sharp focus. This information is then sent to the lens to adjust its focus accordingly.
- Multiple Autofocus Points. DSLR cameras are equipped with multiple autofocus points spread across the frame. Each autofocus point can detect phase differences independently, allowing for precise focus adjustment on different areas of the frame.
Now that we understand how autofocusing works in our camera, we can understand how to improve that functionality by changing how it’s used, to our advantage.
What is Back Button Focusing?
Back button focusing isn’t a new concept; it has been around for decades, evolving alongside advancements in camera technology. Originally popularized in the realm of sports and wildlife photography, back-button focusing provided photographers with a means to track and maintain focus on moving subjects with precision and control.
Over time, its utility expanded to encompass various genres, from portraiture to macro photography, earning it a place in the arsenal of professional and amateur photographers alike.

At its core, back-button focusing involves separating the act of focusing from the shutter button on your camera. Traditionally, autofocus and shutter release are linked, requiring you to half-press the shutter button to lock focus and fully press it to capture the image.
Back button focusing decouples these functions, assigning autofocus activation to a dedicated button on the back of the camera, commonly labeled as AF-ON or AE-L/AF-L.
The Advantages of Using a Separate Button for Focusing
There are several advantages of using back-button focusing, offering photographers unprecedented control and flexibility in their shooting process. Let’s explore some key benefits.
- Focus and Recompose. With traditional focusing, locking focus on your subject often necessitates centering them in the frame and then recomposing your shot before pressing the shutter. This method can be cumbersome, particularly in dynamic situations. Back button focusing allows you to lock focus and then freely recompose without losing focus, enabling more creative compositions.
- Continuous Autofocus. Tracking moving subjects becomes effortless with back-button focusing. By keeping the autofocus engaged with the back button in AI Servo/AF-C mode, you can maintain focus on a subject as it moves through the frame, ensuring sharp images even in fast-paced scenarios such as sports or wildlife photography.
- Manual Focus Override. There are instances when autofocus may struggle to achieve the desired focus, especially in low light or complex scenes. With back-button focusing, you can seamlessly switch to manual focus override without changing any settings, giving you instant control over fine-tuning your focus for critical shots. This comes in handy in many situations, especially when photographing the night sky or the Milky Way.
- Avoid Moving Subjects Outside the Subject. Autofocus sometimes has issues with moving objects that may be closer or further throughout the field of depth of the scene, and back-button focusing makes it easy to lock focus on the subject and to forget any unimportant moving items in the frame.
What Types of Photography Benefit from Back Button Focusing?
Sports/Fast Movement Photography. Back button focusing makes any shot where speed is a necessity much simpler since you can pre-focus on any spot within the frame, and know that any image taken will retain focus in that area. Sports, wildlife, and street photography benefit from this.
Portraiture. Focusing and recomposing are used repeatedly in producing portrait images, and back-button focusing allows you to do this very easily. Focusing on the eyes is usually the first step in a great portrait, and once you’ve focused on them with the AF-ON button, you can recompose the image to your liking, knowing that the subject’s eyes will be in focus.

Low Light Situations. Since camera autofocus generally struggles in low light, a back-button focusing setup lets the photographer select their focus point manually (usually infinity in astrophotography or when capturing the Milky Way) and then concentrate on framing the scene correctly.

Any Scene with Obstructions throughout the Field of Depth. A scene may contain many non-subjects that may or may not be moving (e.g. tree branches, blades of grass), and back-button focusing means that you can select a focal point and keep it in focus despite anything else in the scene that might be moving around.
In some situations, autofocus will struggle with many objects in a scene, and this is where being able to seamlessly switch to manual focusing can solve the problem.

Is it All Roses Though? Back Button Focusing Disadvantages
There aren’t many disadvantages to using back-button focusing, and certainly nothing that outweighs the advantages. Primarily, it’s the fact that focusing this way is outside the norm, and if you’re used to the way a digital camera normally works, you’ll need to make some adjustments until your muscle memory eventually locks into the new way of doing things. Once it does, everything becomes second nature, and you’ll wonder why you didn’t do this earlier.
Focus tracking (holding down the AF-ON button while in AI Servo/AF-C mode and tracking a subject to lock continuous focus) can also be cumbersome and tiring in some situations since you’ll be holding the button down the entire time you’re tracking the subject.
And finally, if you turn your camera over to someone else to use, you’ll need to explain the new procedure for focusing to them. A minor pain, but still something you’ll have to remember if you let anyone use your camera.
How to Turn On Back Button Focusing
Implementing back-button focusing on your camera is a straightforward process, and I’ve outlined the general process, although the exact steps may vary depending on your camera model, which you’ll find below.
1. Locate the AF-ON Button. Most DSLRs and mirrorless cameras feature a dedicated AF-ON button on the back of the camera body (this may also be labeled AE-L/AF-L), typically positioned near the thumb rest. This will become your new focus button once the steps below are completed.
2. Disable AF from the Shutter Button. Navigate to your camera’s menu settings and look for an option to disable autofocus activation from the shutter button. This action effectively decouples autofocus from the shutter release, and you’ll no longer be able to focus using the shutter button.

3. Assign AF-ON Function. Once the shutter button is freed from autofocus duties, assign the autofocus activation function to the AF-ON button. You now can use this back button to focus your camera.

4. Customize Settings. Explore additional customization options related to back-button focusing in your camera’s menu, such as focus tracking sensitivity, autofocus area selection, and button customization. Adjust these settings to suit your shooting style and preferences.
And now we’ll go through specific steps for a few of the major camera brands.
Canon
- Navigate to the Custom Functions menu in the camera’s settings.
- Look for the option labeled “Custom Controls” or something similar.
- Within Custom Controls, find the setting for “Shutter/AE Lock Button” or “AF-ON Button.”
- Select the AF-ON button as the autofocus activation button.
- Disable autofocus activation from the shutter button.
Nikon
- Access the Custom Settings menu on the camera.
- Look for the option labeled “Autofocus” or “Custom Setting Menu.”
- Within Autofocus settings, find the option for “AF activation.”
- Choose the option to assign AF activation to the AF-ON button.
- Disable autofocus activation from the shutter button.
- Customize additional settings as needed, such as focus tracking modes or button customization.
Sony
- Navigate to the Custom Key Settings menu in the camera’s settings.
- Find the function associated with autofocus activation.
- Assign the AF-ON button on the back of the camera as the autofocus activation button.
- Disable autofocus activation from the shutter button, if desired.
- Customize additional settings according to preferences, such as focus area selection or manual focus override.
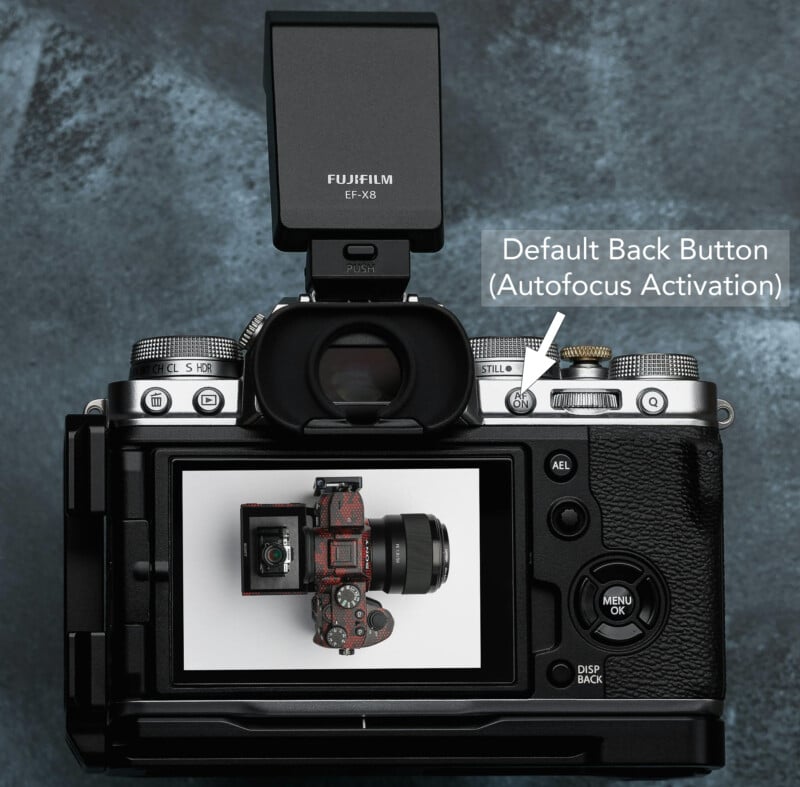
Fujifilm
- Access the Button/Dial Settings menu in the camera’s settings.
- Locate the option for “AF-L Button Setting” or similar.
- Assign the AF-L button on the back of the camera as the autofocus activation button.
- Disable autofocus activation from the shutter button, if desired.
- Customize additional settings as needed, such as focus area selection or manual focus override.
Olympus
- Go to the Custom Menu in the camera’s settings.
- Find the option for “Button/Dial Function” or similar.
- Look for the setting associated with autofocus activation.
- Assign the AEL/AFL button on the back of the camera as the autofocus activation button.
- Disable autofocus activation from the shutter button, if desired.
- Customize additional settings according to preferences, such as focus mode selection or manual focus override.
Now What? Mastering Back Button Focusing Techniques
Now that you’ve set up back-button focusing, it’s time to explore advanced techniques that will elevate your photography to new heights.
1. Focus and Recompose. Experiment with locking focus on your subject using the back button, then freely recompose your shot without losing focus. This technique is particularly useful for portraits, still-life photography, and situations where precise composition is crucial.

2. Tracking Moving Subjects. Engage continuous autofocus with the back button in AI Servo/AF-C mode and track your subject’s movement through the frame. Keep the focus locked on the subject to ensure sharp images throughout the sequence, even in fast-paced scenarios like sports or street photography.
3. Manual Focus Override. In challenging lighting conditions or when autofocus struggles to acquire focus, seamlessly switch to manual focus override using the focus ring on your lens. The back button keeps autofocus engaged until you’re ready to take control manually, offering a seamless transition between autofocus and manual focus.

Practical Tips for Back Button Focusing
To make the most of back-button focusing in your photography, consider the following practical tips.
- Practice Practice Practice! Familiarize yourself with the nuances of back-button focusing through regular practice sessions. Experiment with different shooting scenarios and techniques to hone your skills.
- Customize Controls. Take advantage of your camera’s customization options to tailor back-button focusing to your specific needs. Experiment with different button configurations and settings to find what works best for you.
- Stay Mindful of Button Placement. Be mindful of the placement and ergonomics of the AF-ON button on your camera. Ensure it’s easily accessible and comfortable to use, especially during extended shooting sessions.
- Combine with Focus Modes. Experiment with different autofocus modes, such as single servo (AF-S) and continuous servo (AF-C), in conjunction with back-button focusing to suit different shooting scenarios.
Back button focusing is more than just a technique; it’s a paradigm shift in how photographers approach focus and composition that’s been in motion for many years. By decoupling autofocus from the shutter button, you gain increased control and precision, empowering you to capture the perfect shot in any situation.
Regardless of your experience level, mastering back-button focusing will undoubtedly enhance your photographic journey. So, take the plunge and make the change, your photos will thank you for it!